Causes of the Memory Management Blue Screen of Death Error in Windows 10? Memory Management BSOD Error generally means that there is something critical going on with your system memory and here are some well-known causes for the Memory_Management error: There can a number of reasons for Windows Stop Memory Management error because it all depends on users system configuration and environment. Therefore, we are going to list all the possible solutions for this issue. So without wasting any time let’s see How to Fix Memory Management Error in Windows 10 with the help of the below-listed guide.
11 Ways to Fix Memory Management Error in Windows 10
Make sure to create a restore point just in case something goes wrong.
11 Ways to Fix Memory Management Error in Windows 10 Method 1: Run System File Checker and Check Disk Method 2: Run Windows Memory Diagnostic Tool Method 3: Run MemTest86 Method 4: Make sure Windows is up to date Method 5: Update your graphics card drivers Method 6: Run CCleaner and Malwarebytes Method 7: Perform System Restore Method 8: Manually increase Virtual Memory Method 9: Run Disk Cleanup Method 10: Clean Memory Slot Method 11: Reset Windows 10 (Last Resort)
Method 1: Run System File Checker and Check Disk
1.Press Windows Key + X then click on Command Prompt(Admin).
2.Now type the following in the cmd and hit enter:
3.Wait for the above process to finish and once done restart your PC. 4.Next, run CHKDSK from here Fix File System Errors with Check Disk Utility(CHKDSK). 5.Let the above process complete and again reboot your PC to save changes.
Method 2: Run Windows Memory Diagnostic Tool
If you have a faulty RAM then the best way to determine this is to run Windows Memory Diagnostic Tool and if the test results indicate that RAM has some issues then you can easily replace it with a new one and can easily fix Memory Management Error in Windows 10. 1.Type memory in the Windows search bar and select “Windows Memory Diagnostic.“ 2.In the set of options displayed select “Restart now and check for problems.“
3.After which Windows will restart to check for possible RAM errors and will hopefully Fix Memory Management Error in Windows 10. 4.Reboot your PC to save changes.
Method 3: Run MemTest86
1.Connect a USB flash drive to your system. 2.Download and install Windows Memtest86 Auto-installer for USB Key. 3.Right-click on the image file which you just downloaded and select “Extract here” option. 4.Once extracted, open the folder and run the Memtest86+ USB Installer. 5.Choose your plugged in USB drive, in order to burn the MemTest86 software (This will format your USB drive).
6.Once the above process is finished, insert the USB to the PC in which you’re getting the “Memory Management Error“. 7.Restart your PC and make sure that boot from the USB flash drive is selected. 8.Memtest86 will begin testing for memory corruption in your system.
9.If you have passed all the test then you can be sure that your memory is working correctly. 10.If some of the steps were unsuccessful then Memtest86 will find memory corruption which means “Memory Management Error” is because of bad/corrupt memory. 11.In order to Fix Memory Management Error in Windows 10, you will need to replace your RAM if bad memory sectors are found.
Method 4: Make sure Windows is up to date
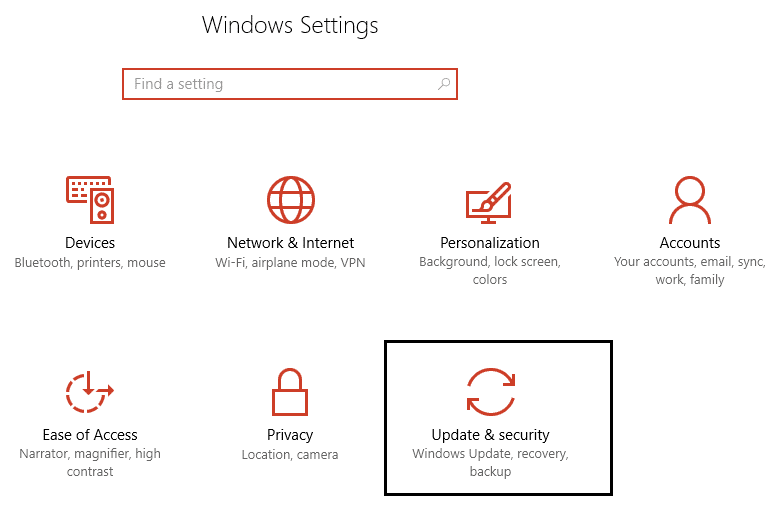
1.Press Windows Key + I then select Update & Security.
2.Next, again click Check for updates and make sure to install any pending updates.
3.After the updates are installed reboot your PC.
Method 5: Update your graphics card drivers
1.Press Windows Key + R then type “devmgmt.msc” (without quotes) and hit enter to open Device Manager.
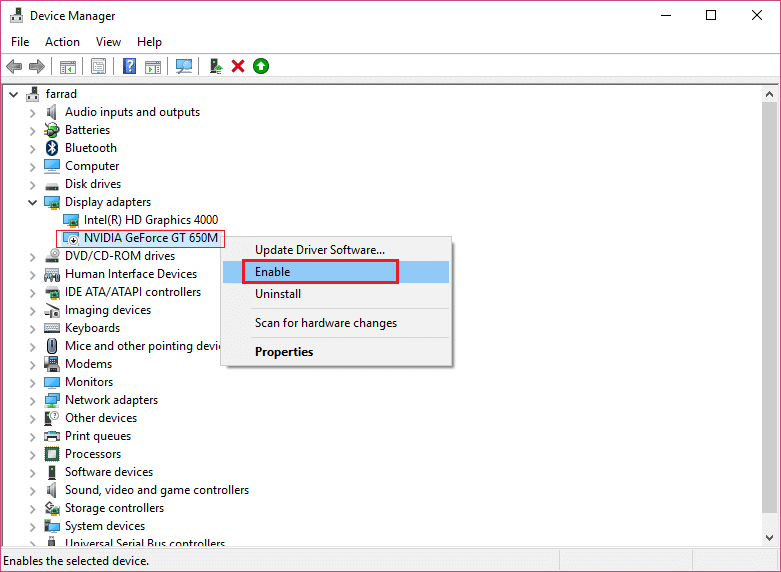
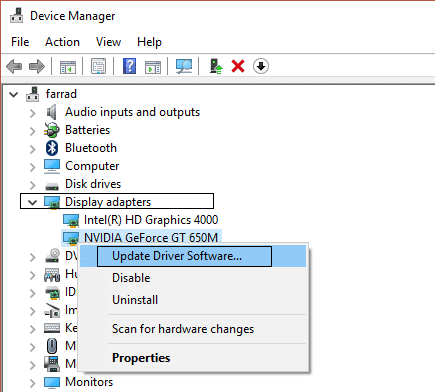
2.Next, expand Display adapters and right-click on your Nvidia Graphic Card and select Enable.
3.Once you have done this again right-click on your graphics card and select “Update Driver Software.“
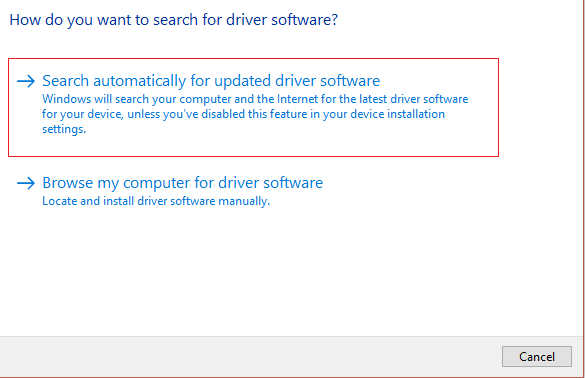
4.Select “Search automatically for updated driver software” and let it finish the process.
5.If the above step was able to fix your problem then very good, if not then continue. 6.Again select “Update Driver Software” but this time on the next screen select “Browse my computer for driver software.“
7.Now select “Let me pick from a list of device drivers on my computer.”
8.Finally, select the compatible driver from the list for your Nvidia Graphic Card and click Next. 9.Let the above process finish and restart your PC to save changes. After updating the Graphics card driver you may be able to Fix Memory Management Error in Windows 10.
Method 6: Run CCleaner and Malwarebytes
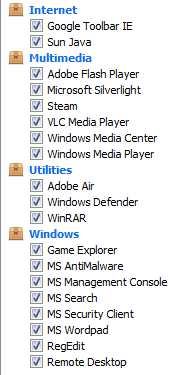
1.Download and install CCleaner & Malwarebytes. 2.Run Malwarebytes and let it scan your system for harmful files. 3.If malware is found it will automatically remove them. 4.Now run CCleaner and in the “Cleaner” section, under the Windows tab, we suggest checking the following selections to be cleaned:
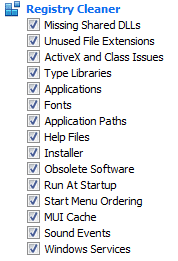
5.Once you’ve made certain the proper points are checked, simply click Run Cleaner, and let CCleaner run its course. 6.To clean your system further select the Registry tab and ensure the following are checked:
7.Select Scan for Issue and allow CCleaner to scan, then click Fix Selected Issues. 8.When CCleaner asks “Do you want backup changes to the registry?” select Yes. 9.Once your backup has completed, select Fix All Selected Issues. 10.Restart your PC to save changes.
Method 7: Perform System Restore
1.Press Windows Key + R and type”sysdm.cpl” then hit enter.
2.Select System Protection tab and choose System Restore.
3.Click Next and choose the desired System Restore point.
4.Follow the on-screen instruction to complete system restore. 5.After reboot, you may be able to Fix Memory Management Error in Windows 10.
Method 8: Manually increase Virtual Memory
1.Press Windows Key + R and type sysdm.cpl in the Run dialog box and click OK to open System Properties.
2.In the System Properties window, switch to the Advanced tab and under Performance, click on Settings option.
3.Next, in the Performance Options window, switch to the Advanced tab and click on Change under Virtual memory.
4.Finally, in the Virtual memory window shown below, uncheck the “Automatically manage paging file size for all drive” option. Then highlight your system drive under Paging file size for each type heading and for the Custom size option, set the suitable values for fields: Initial size (MB) and Maximum size (MB). It is highly recommended to avoid selecting No paging file option here.
5.Select the radio button which says Custom size and set the initial size to 1500 to 3000 and maximum to at least 5000 (Both of these depends on the size of your hard disk). Note: You can always set the Recommended values for fields: Initial size (MB) and Maximum size (MB). 6.Now if you’ve increased the size, a reboot is not mandatory. But if you’ve decreased the size of the paging file, you must have to reboot to make changes effective.
Method 9: Run Disk Cleanup
Disk Cleanup generally deletes temporary files, system files, empties Recycle Bin, remove a variety of other items that you might no longer need. Disk Cleanup also comes up with a new System compression which will compress Windows binaries and program files to save disk space on your system. Anyway, without wasting any time let’s see How to Run Disk Cleanup to Fix Memory Management Error in Windows 10.
Method 10: Clean Memory Slot
Note: Don’t open your PC as it may void your warranty, if you don’t know what to do please take your laptop to the service center. If you don’t know what you are doing then expert supervision is recommended. Try to switch RAM in another memory slot then try using only one memory and see if you can use the PC normally. Also, clean memory slot vents just to be sure and again check if this fixes the issue. If you have two RAM slots then remove both RAM’s, clean the slot and then insert RAM in only one slot and see if the issue is resolved. If it didn’t, then again do the same thing with another slot and see if this helps in fixing the issue. Now if you are still facing the MEMORY_MANAGEMENT error then you need to replace your RAM with a new one which will definitely fix the issue.
Method 11: Reset Windows 10 (Last Resort)
Note: If you can’t access your PC then restart your PC a few times until you start Automatic Repair. Then navigate to Troubleshoot > Reset this PC > Remove everything. 1.Press Windows Key + I to open Settings then click on Update & Security icon.
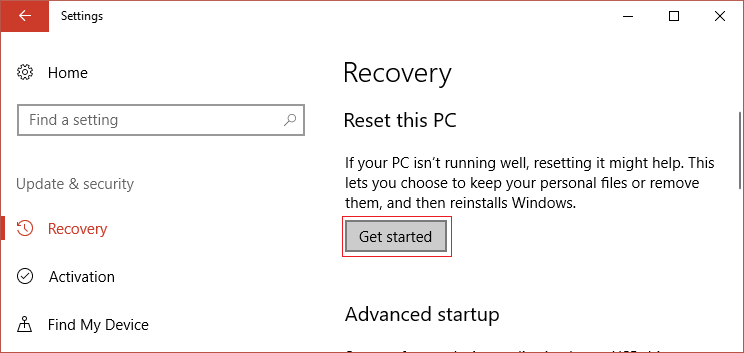
2.From the left-hand menu select Recovery. 3.Under Reset this PC click on the “Get Started” button.
4.Select the option to Keep my files.
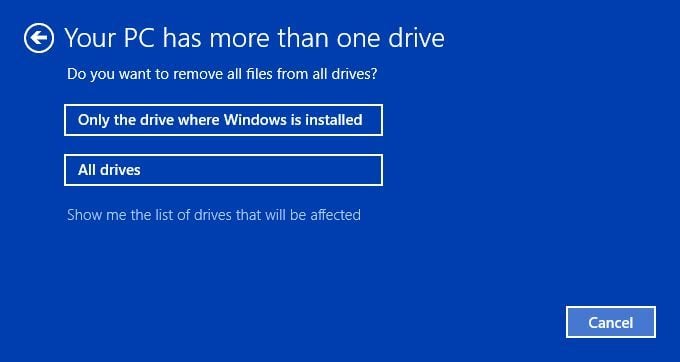
5.For the next step you might be asked to insert Windows 10 installation media, so ensure you have it ready. 6.Now, select your version of Windows and click on only the drive where Windows is installed > Just remove my files.
5.Click on the Reset button. 6.Follow the instructions on the screen to complete the reset. Recommended:
Fix Bluetooth won’t turn ON in Windows 10 Reset Folder View Settings to Default in Windows 10 Enable or Disable Inline AutoComplete in Windows 10 Fix Option to Turn Bluetooth on or off is Missing from Windows 10
That’s it, you have successfully Fix Memory Management Error in Windows 10 but if you still have any queries regarding this tutorial then feel free to ask them in the comment’s section.








![]()
