The same case is with the PowerShell, it also offers the very same features as offered by Windows 10 Command Prompt. And you also need to disable the “Use legacy console” for PowerShell in order for you to utilize these features. Anyway without wasting any time let’s see How to Enable or Disable Legacy Console for Command Prompt and PowerShell in Windows 10 with the help of the below-listed tutorial.
Enable Legacy Console for Command Prompt and PowerShell in Windows 10
Make sure to create a restore point just in case something goes wrong.
Enable Legacy Console for Command Prompt and PowerShell in Windows 10 Method 1: Enable or Disable Legacy Console for Command Prompt in Windows 10 Method 2: Enable or Disable Legacy Console for PowerShell in Windows 10 Method 3: Enable or Disable Legacy Console for Command Prompt and PowerShell in Windows 10
Method 1: Enable or Disable Legacy Console for Command Prompt in Windows 10
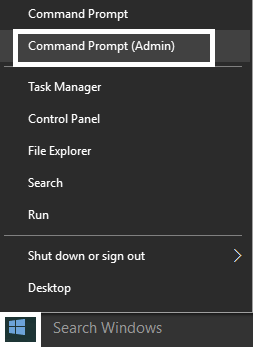
1.Press Windows Key + X then select Command Prompt (Admin).
2.Right-click on the Title bar of the Command Prompt and select Properties.
3.If you want to enable legacy mode then checkmark “Use legacy console (requires relaunch)” and click OK.
Note: The following features would be disabled once you restart Command Promot: Enable Ctrl key shortcuts, Filter clipboard contents on paste, Enable line wrapping selection, and Extended text selection keys. 4.Similarly, if you want to disable legacy mode then uncheck “Use legacy console (requires relaunch)” and click OK.
5.Reboot your PC to save changes.
Method 2: Enable or Disable Legacy Console for PowerShell in Windows 10
1.Type powershell in Windows Search then right-click on it and select Run as Administrator.
2.Right-click on the Title bar of the PowerShell window and select Properties.
3.If you want to enable legacy mode then checkmark “Use legacy console (requires relaunch)” and click OK.
Note: The following features would be disabled once you restart PowerShell: Enable Ctrl key shortcuts, Filter clipboard contents on paste, Enable line wrapping selection, and Extended text selection keys. 4.Similarly, if you want to disable legacy mode then uncheck “Use legacy console (requires relaunch)” and click OK.
5.Reboot your PC to save changes. Also Read: How to Deactivate Primary PS4 Console
Method 3: Enable or Disable Legacy Console for Command Prompt and PowerShell in Windows 10
1.Press Windows Key + R then type regedit and hit Enter to open Registry Editor.
2.Navigate to the following registry key: HKEY_CURRENT_USER\Console 3.Select Console then in the right window pane scroll down to ForceV2 DWORD.
4.Double-click on ForceV2 DWORD then change the value accordingly and click OK: 0 = Enable Use legacy console 1 = Disable Use legacy console
5.Reboot your PC to save changes. Recommended:
Enable or Disable ClearType in Windows 10 Enable or Disable Mouse ClickLock in Windows 10 Easily Access Color And Appearance In Windows 10 Enable or Disable Color Filters in Windows 10
That’s it you have successfully learned How to Enable or Disable Legacy Console for Command Prompt and PowerShell in Windows 10 but if you still have any queries regarding this post then feel free to ask them in the comment’s section.


