System Restore did not complete successfully. Your computer’s system files and settings were not changed. Details: System Restore failed while restoring the directory from the restore point. Source: AppxStaging Destination: %ProgramFiles%\WindowsApps An unspecified error occurred during System Restore. The below guide will fix the following errors: System Restore did not complete Error 0x8000ffff successfully System Restore did not complete successfully with error 0x80070005 An unspecified error occurred during System Restored 0x80070091 Fix Error 0x8007025d while trying to restore
Fix System Restore did not complete successfully.
Method 1: Perform a Clean Boot
Sometimes 3rd party software can conflict with System Restore and therefore, you should not be able to restore your system to an earlier time using a system restore point. To Fix System Restore did not completely error successfully, you need to perform a clean boot in your PC and diagnose the issue step by step.
Fix System Restore did not complete successfully. Method 1: Perform a Clean Boot Method 2: Run System Restore from Safe Mode Method 3: Run System File Checker (SFC) and Check Disk (CHKDSK) in Safe Mode Method 4: Run DISM if SFC fails Method 5: Disable Antivirus Before Restoring Method 6: Rename the WindowsApps folder in Safe Mode Method 7: Make sure System Restore Services are running Method 8: Check System Protection settings
Then try to use system restore and see if you’re able to this error.
Method 2: Run System Restore from Safe Mode
Press Windows Key + R then type msconfig and hit Enter to open System Configuration.
Switch to boot tab and checkmark Safe Boot option.
Click Apply, followed by OK.
Restart your PC and system will boot into Safe Mode automatically.
Press Windows Key + R and type sysdm.cpl then hit enter.
Select the System Protection tab and choose System Restore.
Click Next and choose the desired System Restore point.
Follow the on-screen instruction to complete system restore.
After reboot, you may be able to Fix System Restore did not complete successfully.
Method 3: Run System File Checker (SFC) and Check Disk (CHKDSK) in Safe Mode
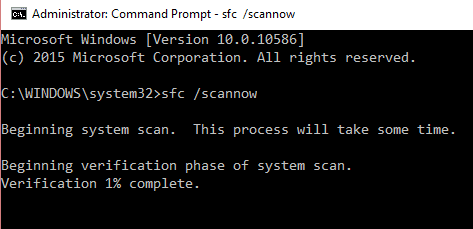
The sfc /scannow command (System File Checker) scans the integrity of all protected Windows system files and replaces incorrectly corrupted, changed/modified, or damaged versions with the correct versions if possible. 1. Open Command Prompt with Administrative rights. 2. Now in the cmd window type the following command and hit Enter: sfc /scannow
Wait for the system file checker to finish. 4.Wait for the above process to finish and the type the following command in cmd and hit Enter: chkdsk C: /f /r /x
Uncheck the Safe Boot option in System Configuration and then restart your PC to save changes.
Method 4: Run DISM if SFC fails
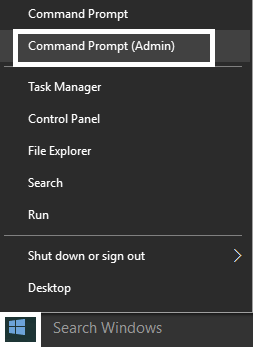
Press Windows Key + X and click on Command Prompt(Admin).
Type the following and press enter:
Let the DISM command run and wait for it to finish.
If the above command doesn’t work, then try on the below: Note: Replace the C:\RepairSource\Windows with your repair source (Windows Installation or Recovery Disc).
Reboot your PC to save changes.
Method 5: Disable Antivirus Before Restoring
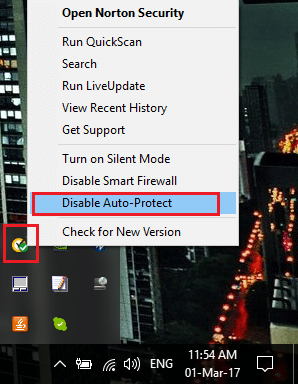
1.Right-click on the Antivirus Program icon from the system tray and select Disable.
2.Next, select the time frame for which the Antivirus will remain disabled.
Note: Choose the smallest amount of time possible, for example, 15 minutes or 30 minutes. 3. Once is done, again try to restore your PC using System Restore and check if the error resolves or not.
Method 6: Rename the WindowsApps folder in Safe Mode
Press Windows Key + R then type msconfig and hit Enter to open System Configuration.
Switch to boot tab and checkmark Safe Boot option.
Click Apply, followed by OK.
Restart your PC and system will boot into Safe Mode automatically.
Press Windows Key + X then select Command Prompt (Admin).
Type the following command in cmd and hit Enter after each one: cd C:\Program Files takeown /f WindowsApps /r /d Y icacls WindowsApps /grant “%USERDOMAIN%%USERNAME%”:(F) /t attrib WindowsApps -h rename WindowsApps WindowsApps.old
Again go to System Configuration and uncheck Safe boot to boot normally.
If you again face the error, then type this in cmd and hit Enter: icacls WindowsApps /grant administrators:F /T This should be able to Fix System Restore did not complete successfully but then try the next method.
Method 7: Make sure System Restore Services are running
Press Windows Keys + R then type services.msc and hit enter.
Now find the following services: System Restore Volume Shadow Copy Task Scheduler Microsoft Software Shadow Copy Provider
Right-click on each of them and select Properties.
Ensure each of these services is running if not then click on Run and set their Startup type to Automatic.
Click Apply, followed by OK.
Reboot your PC to save changes and see if you can Fix System Restore did not complete successfully issue by running System Restore.
Method 8: Check System Protection settings
Right-click on This PC or My Computer and select Properties.
Now click on System Protection in the left-hand menu.
Make sure your hard disk has protection column value set to ON if it’s Off then select your drive and click Configure.
Click Apply, followed by OK and close everything.
Reboot your PC to save changes. Recommended;
Fix Error 0x8007025d while trying to restore Fix Error 0x8007000e Preventing Backups Disable Snap Pop-Up While Moving Windows Fix System Restore Error 0x80070091
You have successfully Fix System Restore did not complete problem successfully, but if you still have any questions regarding this guide, please feel free to ask them in the comment’s section.


