Windows updates are important as it provides security updates & patches, fixes a lot of bugs and improves your system performance. SoftwareDistribution folder is located in the Windows directory and is managed by WUAgent (Windows Update Agent). Do you think that deleting this folder is ever required? On what circumstances, you would delete this folder? Is it safe to delete this folder? These are some questions that we all come across while discussing this folder. On my system, it is consuming more than 1 GB space of C drive. Why would you ever delete this folder? SoftwareDistribution folder should be left alone but there comes a time when you may need to clear the contents of this folder. One such case is when you’re unable to update Windows or when Windows updates which are downloaded & stored in the SoftwareDistribution folder are corrupt or incomplete. In most of the cases, when Windows Update stops working properly on your device and you are getting an error message, you need to flush out this folder to solve the problem. Moreover, if you find that this folder is accumulating a large chunk of data taking more space of the drive, you can manually clear out the folder to free up some space on your drive. However, if you face Windows Update issues such as Windows Update not working, Windows Updates fails, Windows Update stuck while downloading the latest updates, etc. then you need to delete SoftwareDistribution folder on Windows 10.
Is it safe to delete SoftwareDistribution folder? You don’t need to touch this folder under any normal circumstances, but if the content of the folder is corrupted or not synchronized causing issues with Windows updates then you need to delete this folder. It is completely safe to delete this folder. However, you need to first make sure that you are experiencing a problem with your Windows Update. Next time when Windows Update files are ready, Windows will automatically create this folder and download the update files from the scratch.
How to Delete SoftwareDistribution Folder on Windows 10
Make sure to create a restore point just in case something goes wrong.
How to Delete SoftwareDistribution Folder on Windows 10 An alternate way to Delete SoftwareDistribution Folder How to Rename SoftwareDistribution folder
To delete SoftwareDistribution folder from your device, you need to either open the Command Prompt or Windows PowerShell 1.Open Command Prompt or Windows PowerShell with Administrator access. Press Windows key + X and select the Command Prompt or PowerShell option.
2.Once PowerShell opens, you need to type below-mentioned commands to stop the Windows Update Service and the Background Intelligent Transfer Service. net stop wuauserv net stop bits
3.Now you need to navigate to SoftwareDistribution folder in C drive to delete all its components: C:\Windows\SoftwareDistribution
If you are not able to delete all files because some files are in use, you just need to restart your device. Upon rebooting, you need to again run the above commands again and follow the steps. Now, again try to delete all the content of the SoftwareDistribution folder. 4.Once you have deleted the content of the SoftwareDistribution folder, you need to type the following command to activate the services related to Windows Update: net start wuauserv net start bits
An alternate way to Delete SoftwareDistribution Folder
1.Press Windows Key + R then type services.msc and hit Enter.
2.Right-click on Windows Update service and select Stop.
3.Open File Explorer then navigate to the following location: C:\Windows\SoftwareDistribution 4.Delete all the files and folders under SoftwareDistribution folder.
5.Again right-click on Windows Update service then select Start.
6.Now to try to download the Windows updates and this time it will without any issues.
How to Rename SoftwareDistribution folder
If you’re worried about deleting the SoftwareDistribution folder then you can simply rename it and Windows will automatically create a new SoftwareDistribution folder to download the Windows updates. 1.Press Windows Key + X then select Command Prompt (Admin).
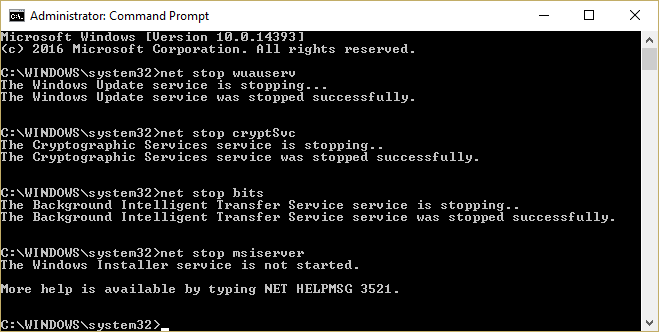
2.Now type the following commands to stop Windows Update Services and then hit Enter after each one: net stop wuauserv net stop cryptSvc net stop bits net stop msiserver
3.Next, type the following command to rename SoftwareDistribution Folder and then hit Enter: ren C:\Windows\SoftwareDistribution SoftwareDistribution.old ren C:\Windows\System32\catroot2 catroot2.old
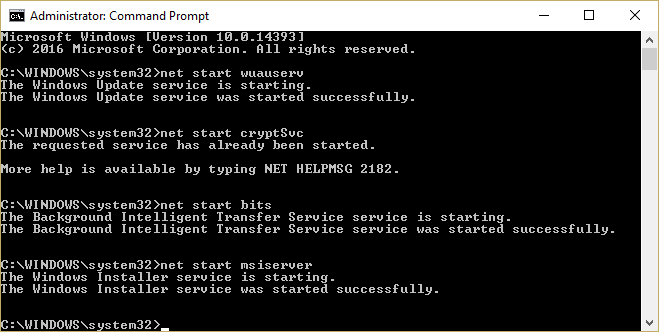
4.Finally, type the folowing command to start Windows Update Services and hit Enter after each one: net start wuauserv net start cryptSvc net start bits net start msiserver
Once you have completed these steps, Windows 10 will automatically create a folder and download the necessary elements for running Windows Update services. If the above step is not working then you can boot Windows 10 into Safe Mode, and rename SoftwareDistribution folder to SoftwareDistribution.old. Note: The only thing which you may lose in the process of deleting this folder is the historical information. This folder also stores the Windows Update history information. Thus, deleting the folder will delete the Windows Update history data from your device. Moreover, the Windows Update process will take more time than it used to take earlier because WUAgent will check and create the Datastore information. Overall, there is no problem associated with the process. It is a small price to pay for getting your device updated with the latest Windows Updates. Whenever you notice Windows Update problems such as Windows Updates files missing, not updating properly, you can opt for this method to restore the Windows Update process. Recommended:
Remove Activate Windows Watermark from Windows 10 How to Fix Bluetooth problems in Windows 10 Enable Flash for Specific Websites in Chrome How to Sideload Apps on Windows 10
I hope the above steps were helpful and now you can easily Delete SoftwareDistribution folder on Windows 10, but if you still have any questions regarding this tutorial then feel free to ask them in the comment’s section.


