Since the Registry Editor stores configuration and internal settings for everything on our computer, it is advised to be extremely cautious when making any changes to it. If one isn’t careful, the editor may be rendered corrupt and cause some serious damage. Therefore, one must always backup their registry before making any modifications. Apart from inaccurate manual changes, a malicious application or virus and any sudden shutdown or system crash can also corrupt the registry. An extremely corrupt registry will prevent your computer from booting on altogether (the boot will be restricted to the blue screen of death) and if the corruption isn’t severe, you may encounter the blue screen error every now and then. Frequent Blue Screen errors will further deteriorate your computer’s condition so fixing a corrupt registry editor as soon as possible is very important. In this article, we have explained various methods to fix a corrupt registry in Windows 10 along with the steps to back up the registry editor before making any changes to it.
Fix Corrupted Registry in Windows 10
Depending on whether the corruption is severe and if the computer is able to boot on, the exact solution will vary for everyone. The easiest way to repair a corrupt registry is to let Windows take control and perform an Automatic Repair. If you are able to boot on your computer, perform scans to fix any corrupt system files, and clean the registry using third-party applications. Finally, you will need to reset your PC, go back to previous Windows versions, or use a bootable Windows 10 drive to fix the registry if nothing works.
Fix Corrupted Registry in Windows 10 Method 1: Use Automatic Repair Method 2: Run an SFC & DISM Scan Method 3: Use a Bootable Windows disc Method 4: Reset your Computer Method 5: Restore a System Backup How to Backup the Registry Editor?
Method 1: Use Automatic Repair
Fortunately, Windows has built-in tools to fix any issues that may prevent the computer from booting on altogether. These tools are part of the Windows Recovery Environment (RE) and can be customized further (add extra tools, different languages, drivers, etc.). There are three different methods via which users can access these diagnostic tools and repair disk and system files.
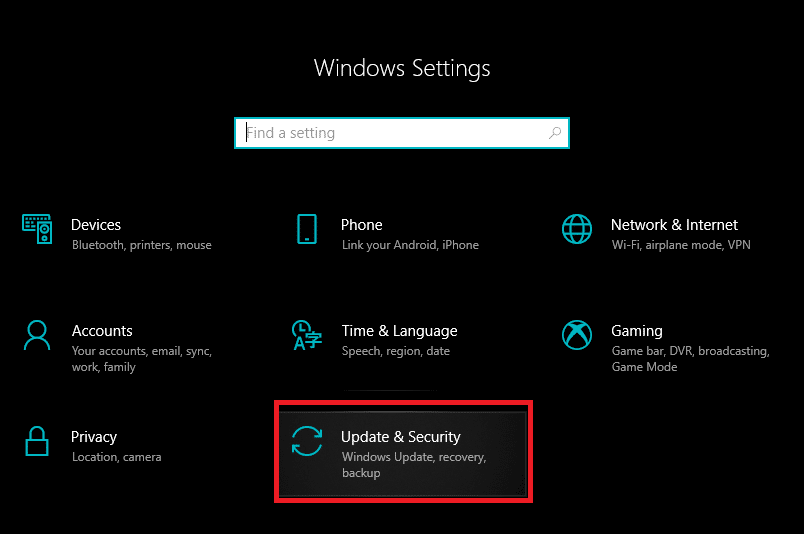
- Press the Windows key to activate the Start menu and click on the cogwheel/gear icon above the power icon to open Windows Settings.
2. Click on Update & Security.
Using the left navigation menu, move to the Recovery settings page then under Advanced startup section click on the Restart now button.
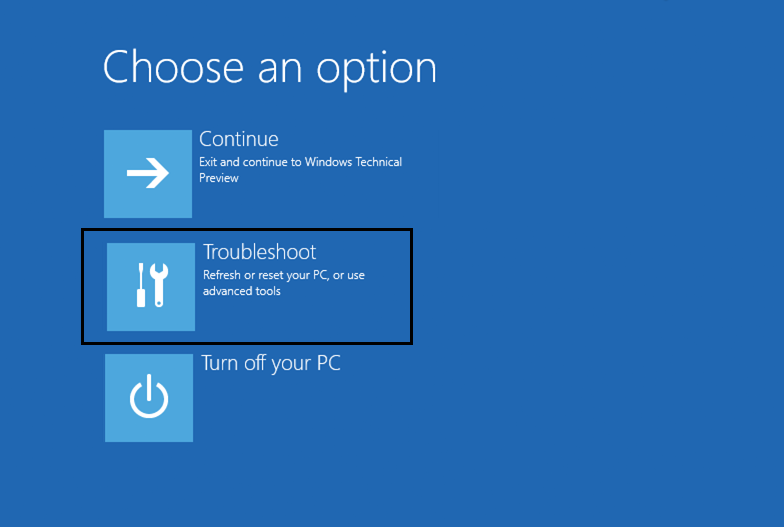
The computer will now Restart and on the Advanced boot screen, you will be presented with three different options, namely, Continue (to Windows), Troubleshoot (to use advanced system tools), and Turn off your PC.
Click on Troubleshoot to continue. Note: If the corrupt registry is preventing your computer from booting on, long-press the power button at the arrival of any error and hold it until the PC turns off (Force Shut Down). Power on the computer again and force shut it down again. Repeat this step until the boot screen reads ‘Preparing Automatic Repair’.
On the following screen, click on Advanced Options.
Finally, click on the Startup or Automatic Repair option to fix your corrupt Registry in Windows 10.
Method 2: Run an SFC & DISM Scan
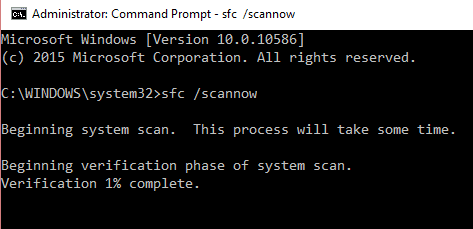
For some lucky users, the computer will boot on in spite of a corrupt registry, if you are one of them, perform system file scans as soon as possible. The System File Checker (SFC) tool is a command-line tool that verifies the integrity of all system files and replaces any corrupt or missing file with a cached copy of it. Similarly, use the Deployment Image Servicing and Management tool (DISM) to service Windows images and fix any corrupt files that the SFC scan may miss or fail to repair.
Open Run command box by pressing Windows key + R then type cmd and press Ctrl + Shift + Enter to open Command Prompt with Administrative privileges. Click Yes on the ensuing User Account Control pop-up to grant the required permissions.
Carefully type the below command and press Enter to execute it: sfc /scannow
Once the SFC scan has verified the integrity of all system files, execute the following command: DISM /Online /Cleanup-Image /RestoreHealth
Method 3: Use a Bootable Windows disc
Another way users can repair their Windows installation is by booting from a bootable USB drive. If you do not have a Windows 10 bootable drive or disc handy, prepare the same by following the guide at How to Create Windows 10 Bootable USB Flash Drive.
Power off your computer and connect the bootable drive.
Boot on the computer from the drive. On the start-up screen, you will be asked to press a specific key to boot from the drive, comply with the instruction.
On the Windows Setup page, click on Repair your computer.
Your computer will now boot on to the Advanced Recovery menu. Select Advanced Options followed by Troubleshoot.
On the next screen, click on Startup or Automatic Repair. Select a user account to continue from and enter the password when prompted.
6. Windows will start auto-diagnosis and repair the corrupt registry.
Method 4: Reset your Computer
If none of the above methods helped you to fix the corrupt registry, your only option is to reset the computer. Users have the option to Reset the computer but keep the files (all third-party applications will be uninstalled and the drive in which Windows is installed will be cleared so move all your personal files to another drive) or Reset and remove everything. First try resetting while keeping the files, if that doesn’t work, reset and remove everything to fix the corrupt Registry in Windows 10:
Press Windows key + I to launch the Settings application and click on Update & Security.
Switch to the Recovery page and click on the Get Started button under Reset This PC.
In the following window, choose ‘Keep my files’, as obvious, this option won’t get rid of your personal files although all the third-party apps will be deleted and the settings will be reset to default.
Now follow all the on-screen instructions to complete resetting. Also Read: Fix The Registry editor has stopped working
Method 5: Restore a System Backup
Another way to reset the registry is to revert back to a previous Windows version during which the registry was completely healthy and didn’t prompt any issues. Although, this only works for users who had the System Restore feature enabled beforehand.
Type control or control panel in the start search bar and press enter to open the application.
Click on Recovery. Adjust the icon size from the top-right corner to make looking for the required item easier.
Under Advanced recovery tools, click on the Open System Restore hyperlink.
In the System Restore window, click on the Next button to continue.
Have a look at the Date & Time information of the various restore points and try to recollect when the corrupt registry issue first appeared (Tick the box next to Show more restore points to view all of them). Select a restore point before that time and click on Scan for affected programs.
In the next window, you will be informed about the applications and drivers that will be replaced with their previous versions. Click on Finish to restore your computer to its state at the selected restore point.
Apart from the discussed methods, you can install a third-party registry cleaner such as Restore Advanced system repair or RegSofts – Registry Cleaner and use it to scan for any corrupted or missing key entries in the editor. These applications fix the registry by restoring the corrupted keys to their default state.
How to Backup the Registry Editor?
Henceforth, before making any changes to the Registry Editor, consider backing it up or you will again be risking your computer.
Type regedit in the Run command box and hit Enter to open the Registry Editor. Click on Yes in the ensuing User Account Control pop-up.
Right-click on Computer in the left pane and select Export.
Select an appropriate location to export the registry (preferably save it in an external storage media such as a pen drive or on a cloud server). To make it easier to identify the backup date, include it in the file name itself (For example Registrybackup17Nov).
Click on Save to finish exporting.
5. If the Registry gets corrupted in the future again, simply connect the storage media containing the backup or download the file from the cloud and import it. To import: Open Registry Editor and click on File. Select Import… from the ensuing menu, locate the registry backup file, and click on Open.
To prevent any further issues with the Registry Editor, properly uninstall applications (remove their residual files) and perform periodic antivirus & antimalware scans. Recommended:
Where is the BSOD log file located in Windows 10? 5 Ways to Stop Automatic Updates on Windows 10 How to Use the Fn Key Lock in Windows 10 Fix Site Can’t Be Reached, Server IP Could Not Be Found
We hope this article was helpful and you were able to easily fix Corrupted Registry on Windows 10. If you still any queries or suggestions then feel free to reach out using the comment section below.


![]()


